 What improves your cash flow, saves you time, and reduces the number of days to get paid by your customers? QuickBooks Payments! With a QuickBooks payments account, you can securely email an invoice and add a “Pay Now” button. You can allow your customer to pay with a credit or debit card, ACH or bank transfer, or even Apple Pay. You eliminate processing the payment in QuickBooks, and as a result, you save money.
Time Savings
After the set up below, customer payments through Payments are automatically applied to the invoice and transaction sits in Undeposited Funds for you to match to a deposit from the bank. Processing a dozen customer payments takes less than a minute. You no longer need to:
- Apply each payment to the invoice
- Take the deposits to the bank
Your clients will save time (and money) because they don’t have to buy checks, mail it to you, or go to their online bill pay.
Payments get to your bank account faster! Your cash flow improves. Your number of days to get paid by your customers goes down.
Cost Savings
The average cost of processing a check is $30. The cost of processing an ATM payment is $10 or less with Payments.
Before Setting Up QuickBooks Payments
You will need to determine:
- Which program you want to use for pricing purposes
- Determine the amount of money to be processed in one transaction and per month
- Have the account and routing number for the bank account you are going to use.
Note: Money received via QuickBooks Payments is sent to “undeposited funds.”
The Setup
It’s easy to set up payments. All you need to do is:
- Go to the gear at the top right, choose “Company,” and then “Payments.”
- Set up Payments
- Determine speed of payments (setting two days for bank transfers avoids the 1% additional fees)
- Enter bank account information
- Map the correct bank account for deposits to go and processing fees to go to in QuickBooks
- Go to ”Settings,” and then “Custom Form Styles.” Choose the template name that you use.
- Go to “Payments” tab (make sure that the “Bank Transfer” and “Credit Card” options are checked.
- Lastly, when you generate invoices, check the box for allowing payments.

The Cost
The fees associated with using QuickBooks next-day payments are:
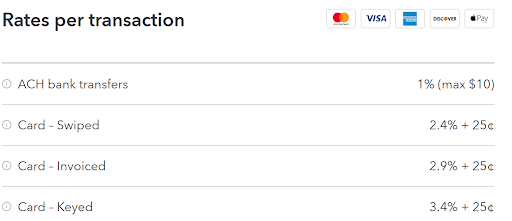
For more information on fees, click here.
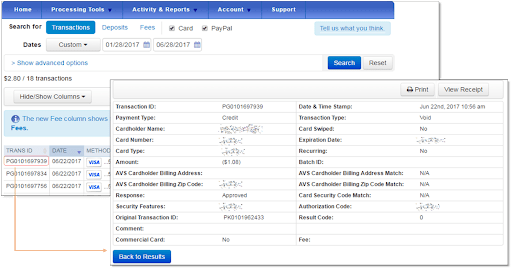
Post Setup
Now that you are set up to receive payments via QuickBooks, you can see who has paid and what, if any, fees are associated with the payments. To view transactions, you need to:
- Sign in to the Merchant Service Center (go the gear icon and select Account and Settings or Company Settings)
- From the Activity & Reports menu, select Transactions. Note: By default, the Basic Search will be selected, which searches by date and payment type (credit card or check).
- Choose the Show advanced options, which allows you to do a more specific search using information like transaction ID and expiration date of the card.
- Select Search. Note: The default Payment Type is Card. If you also have check processing on this merchant account, change the type to Check to view these transactions.
- Choose the Transaction ID to display a detailed view of a transaction. You will also have an option to print the report or export the data as a .csv (comma-separated values) file.
Need Help?
This may seem confusing. Contact us today and we will help you set it up.